It’s 2026, and iPhones are more advanced than ever. With so many new features being introduced each year, it’s completely normal to wonder whether you can still record your screen. The good news is — you absolutely can, and it’s easier than you might think.
If you’ve been searching for how to screen record on iPhone, this guide will walk you through everything you need to know. Whether you’re using the latest iPhone 16 or an older model such as the iPhone 12 or below, the steps are simple and easy to follow.
We’ll break down the process in clear, straightforward language and share a few practical tips to help you get the best results. Screen recording is perfect for creating tutorials, saving important information, demonstrating apps, or sharing something interesting with others.
Millions of iPhone users rely on this feature every day for work, content creation, and personal use. Let’s dive in and help you confidently master how to screen record on iPhone.
The iPhone Screen Recorder Is Better Than Ever
Whether you are solving an issue, creating tutorials, or just sharing something cool, being able to screen record on your iPhone is now a necessary skill. It is no longer a nice-to-have feature but something many of us use on a daily basis.
With the iPhone 16, screen recording has taken a significant leap forward. Apple has brought forth improvements that make screen recording smoother, clearer, and more powerful than ever before.
One of the most significant improvements brought forth in the iPhone 16 is the ability to perform spatial video recording, which is meant for immersive viewing on devices such as the Apple Vision Pro. This feature brings forth a more dynamic and engaging way of viewing. Along with that, features such as Audio Mix in audio tools give content creators more control over audio, enabling clearer voice recording and more balanced background audio.
How to Record Your Screen on iPhone – Getting Set Up
Before you proceed, you need to make sure that everything is set. If you are learning how to screen record on iPhone 13, how to screen record on iPhone 14, how to screen record on iPhone 15, how to screen record on iPhone 16, how to screen record on iPhone 17, or how to screen record on iPhone SE, the first thing that you need to do is make sure that your iPhone is set so that you won’t be rushing at the end when you need to record something important.
The best thing about this is that screen recording is already available on your iOS device. You don’t need to download anything. Once you have enabled it, you can record anything at any time by simply swiping and tapping.
Here are the things that you need to know:
- Screen recording will record everything that is visible on your screen.
- You can record system sounds from your iPhone.
- You can also use your microphone to record voice commentary.
How to Enable Screen Recording on iPhone?
This feature isn’t always enabled by default, so you have to include it in your Control Center first. Don’t worry, it’s easy and only takes a minute.
Step 1: Open Settings
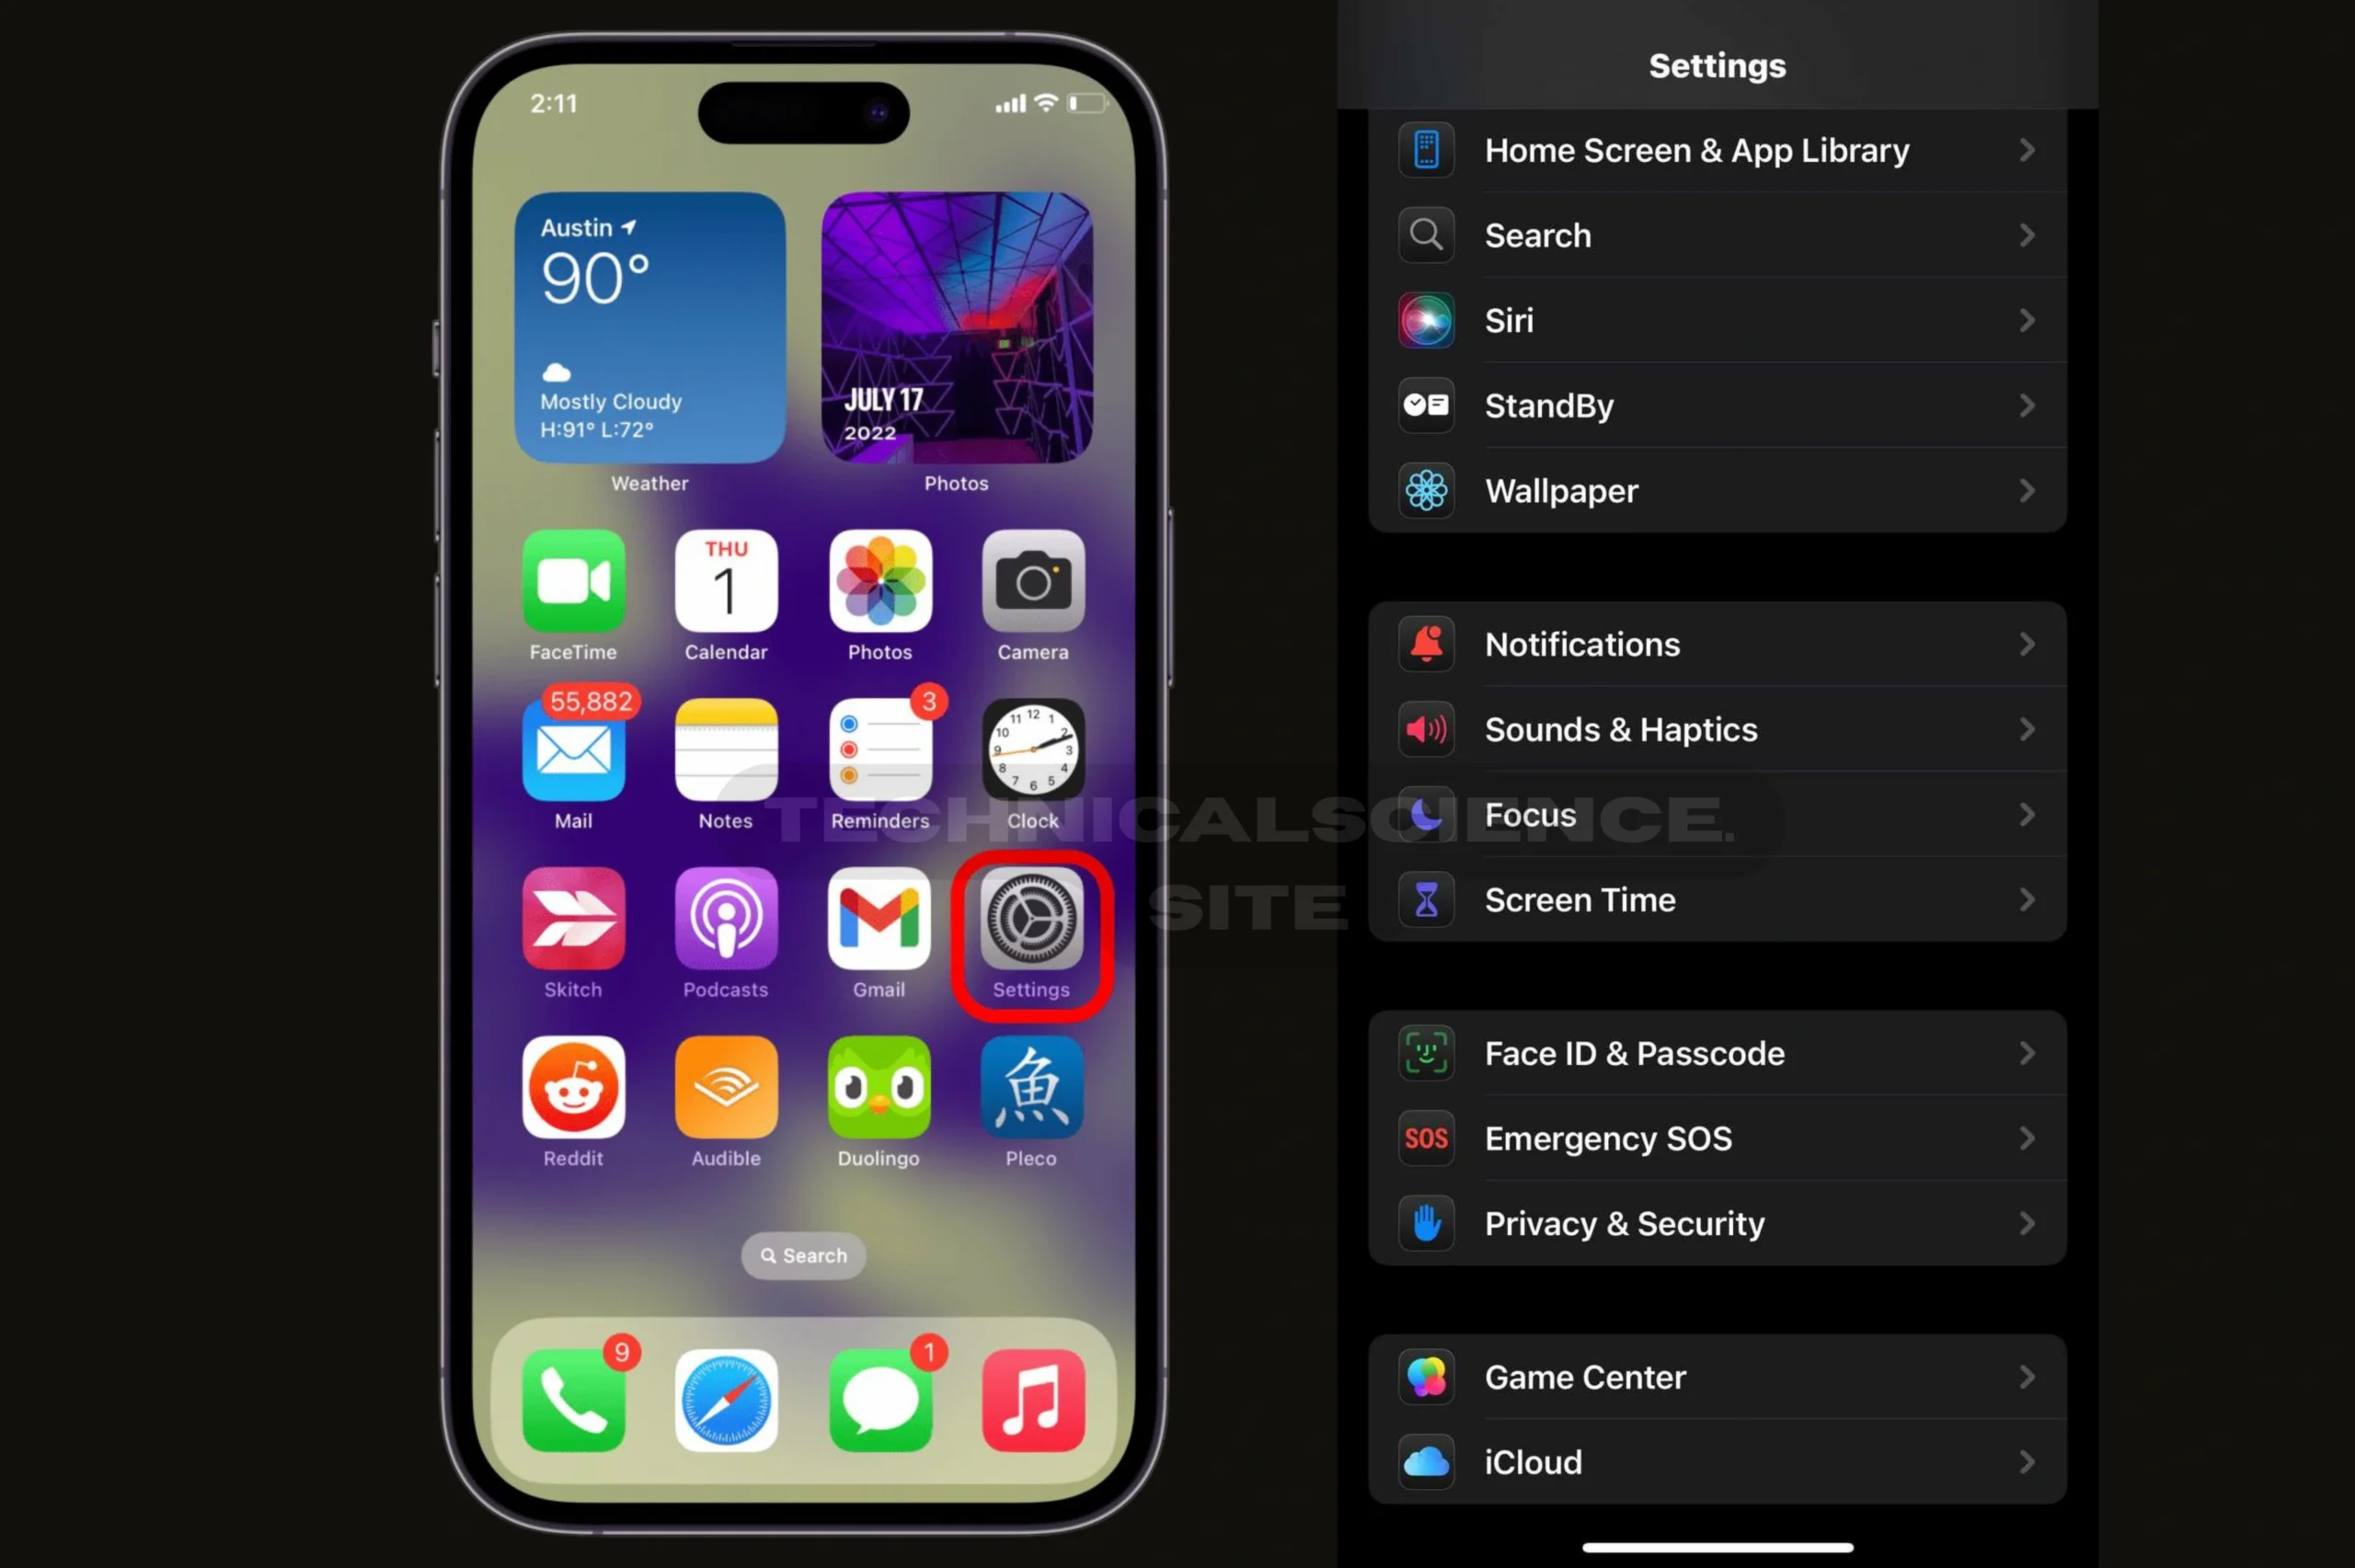
Open the Settings app on your iPhone.
Step 2: Tap Control Center
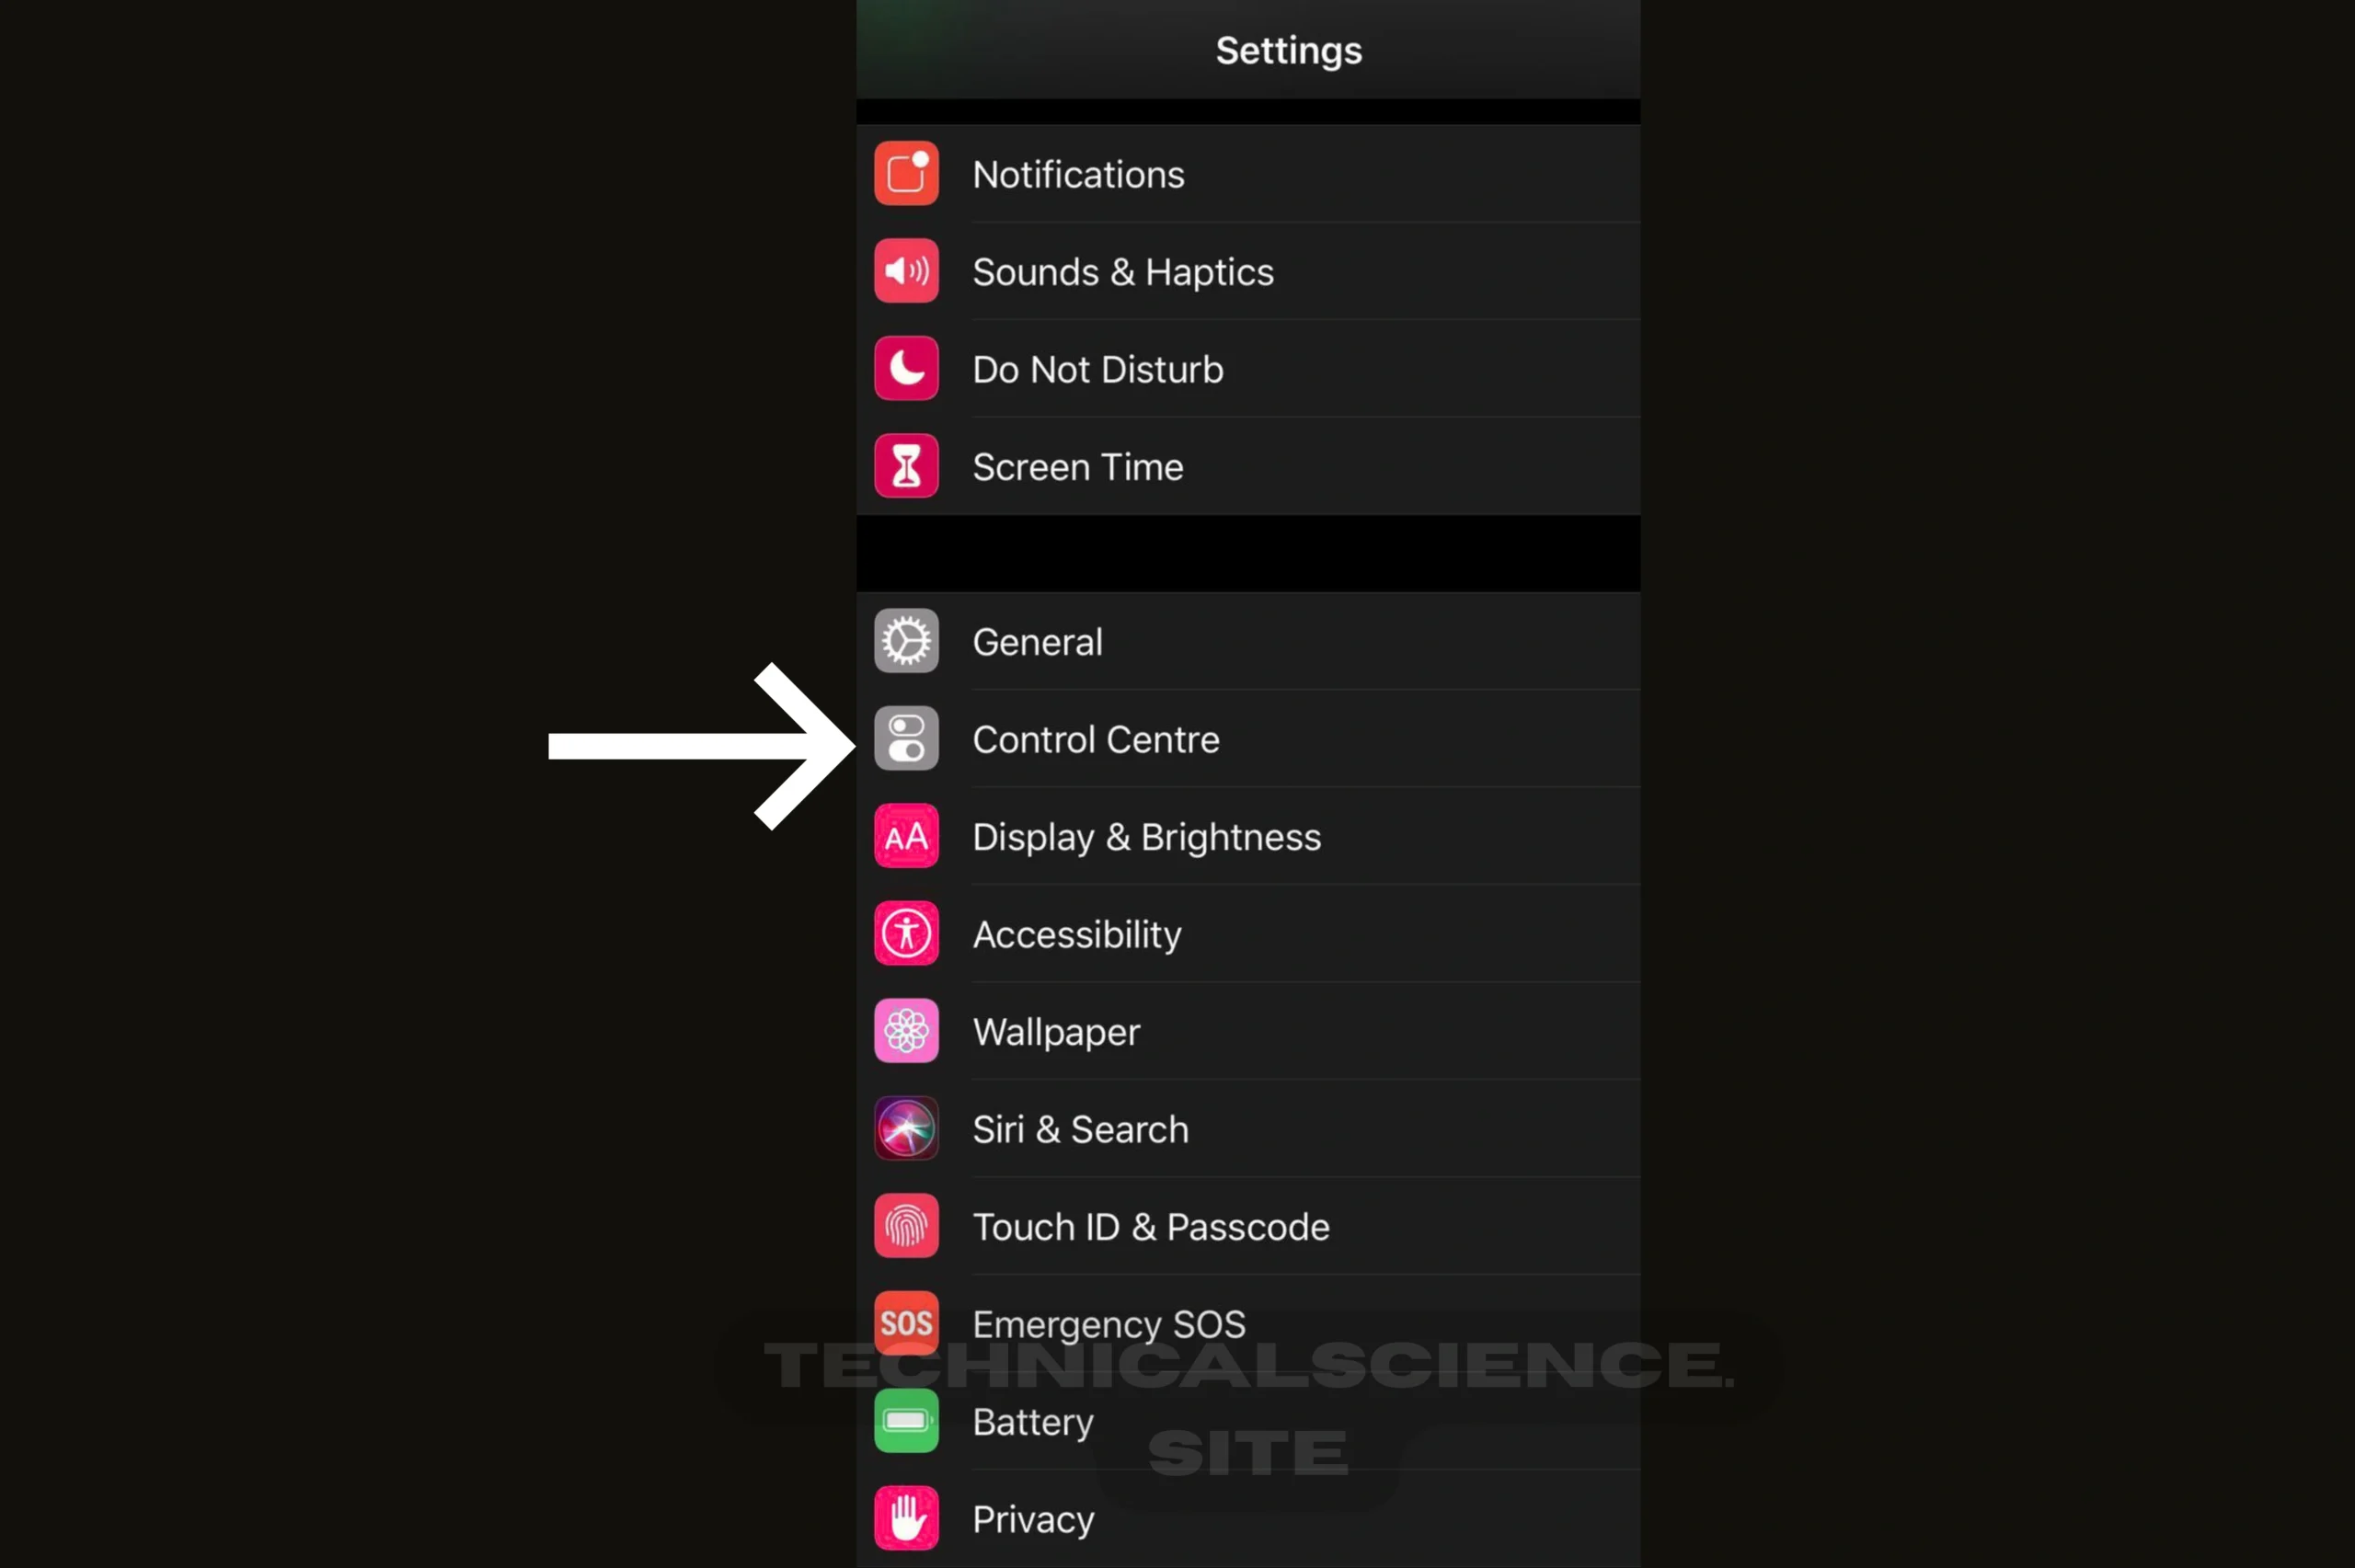
Scroll down and tap Control Center. This is where you control your quick-access functions.
Step 3: Add Screen Recording
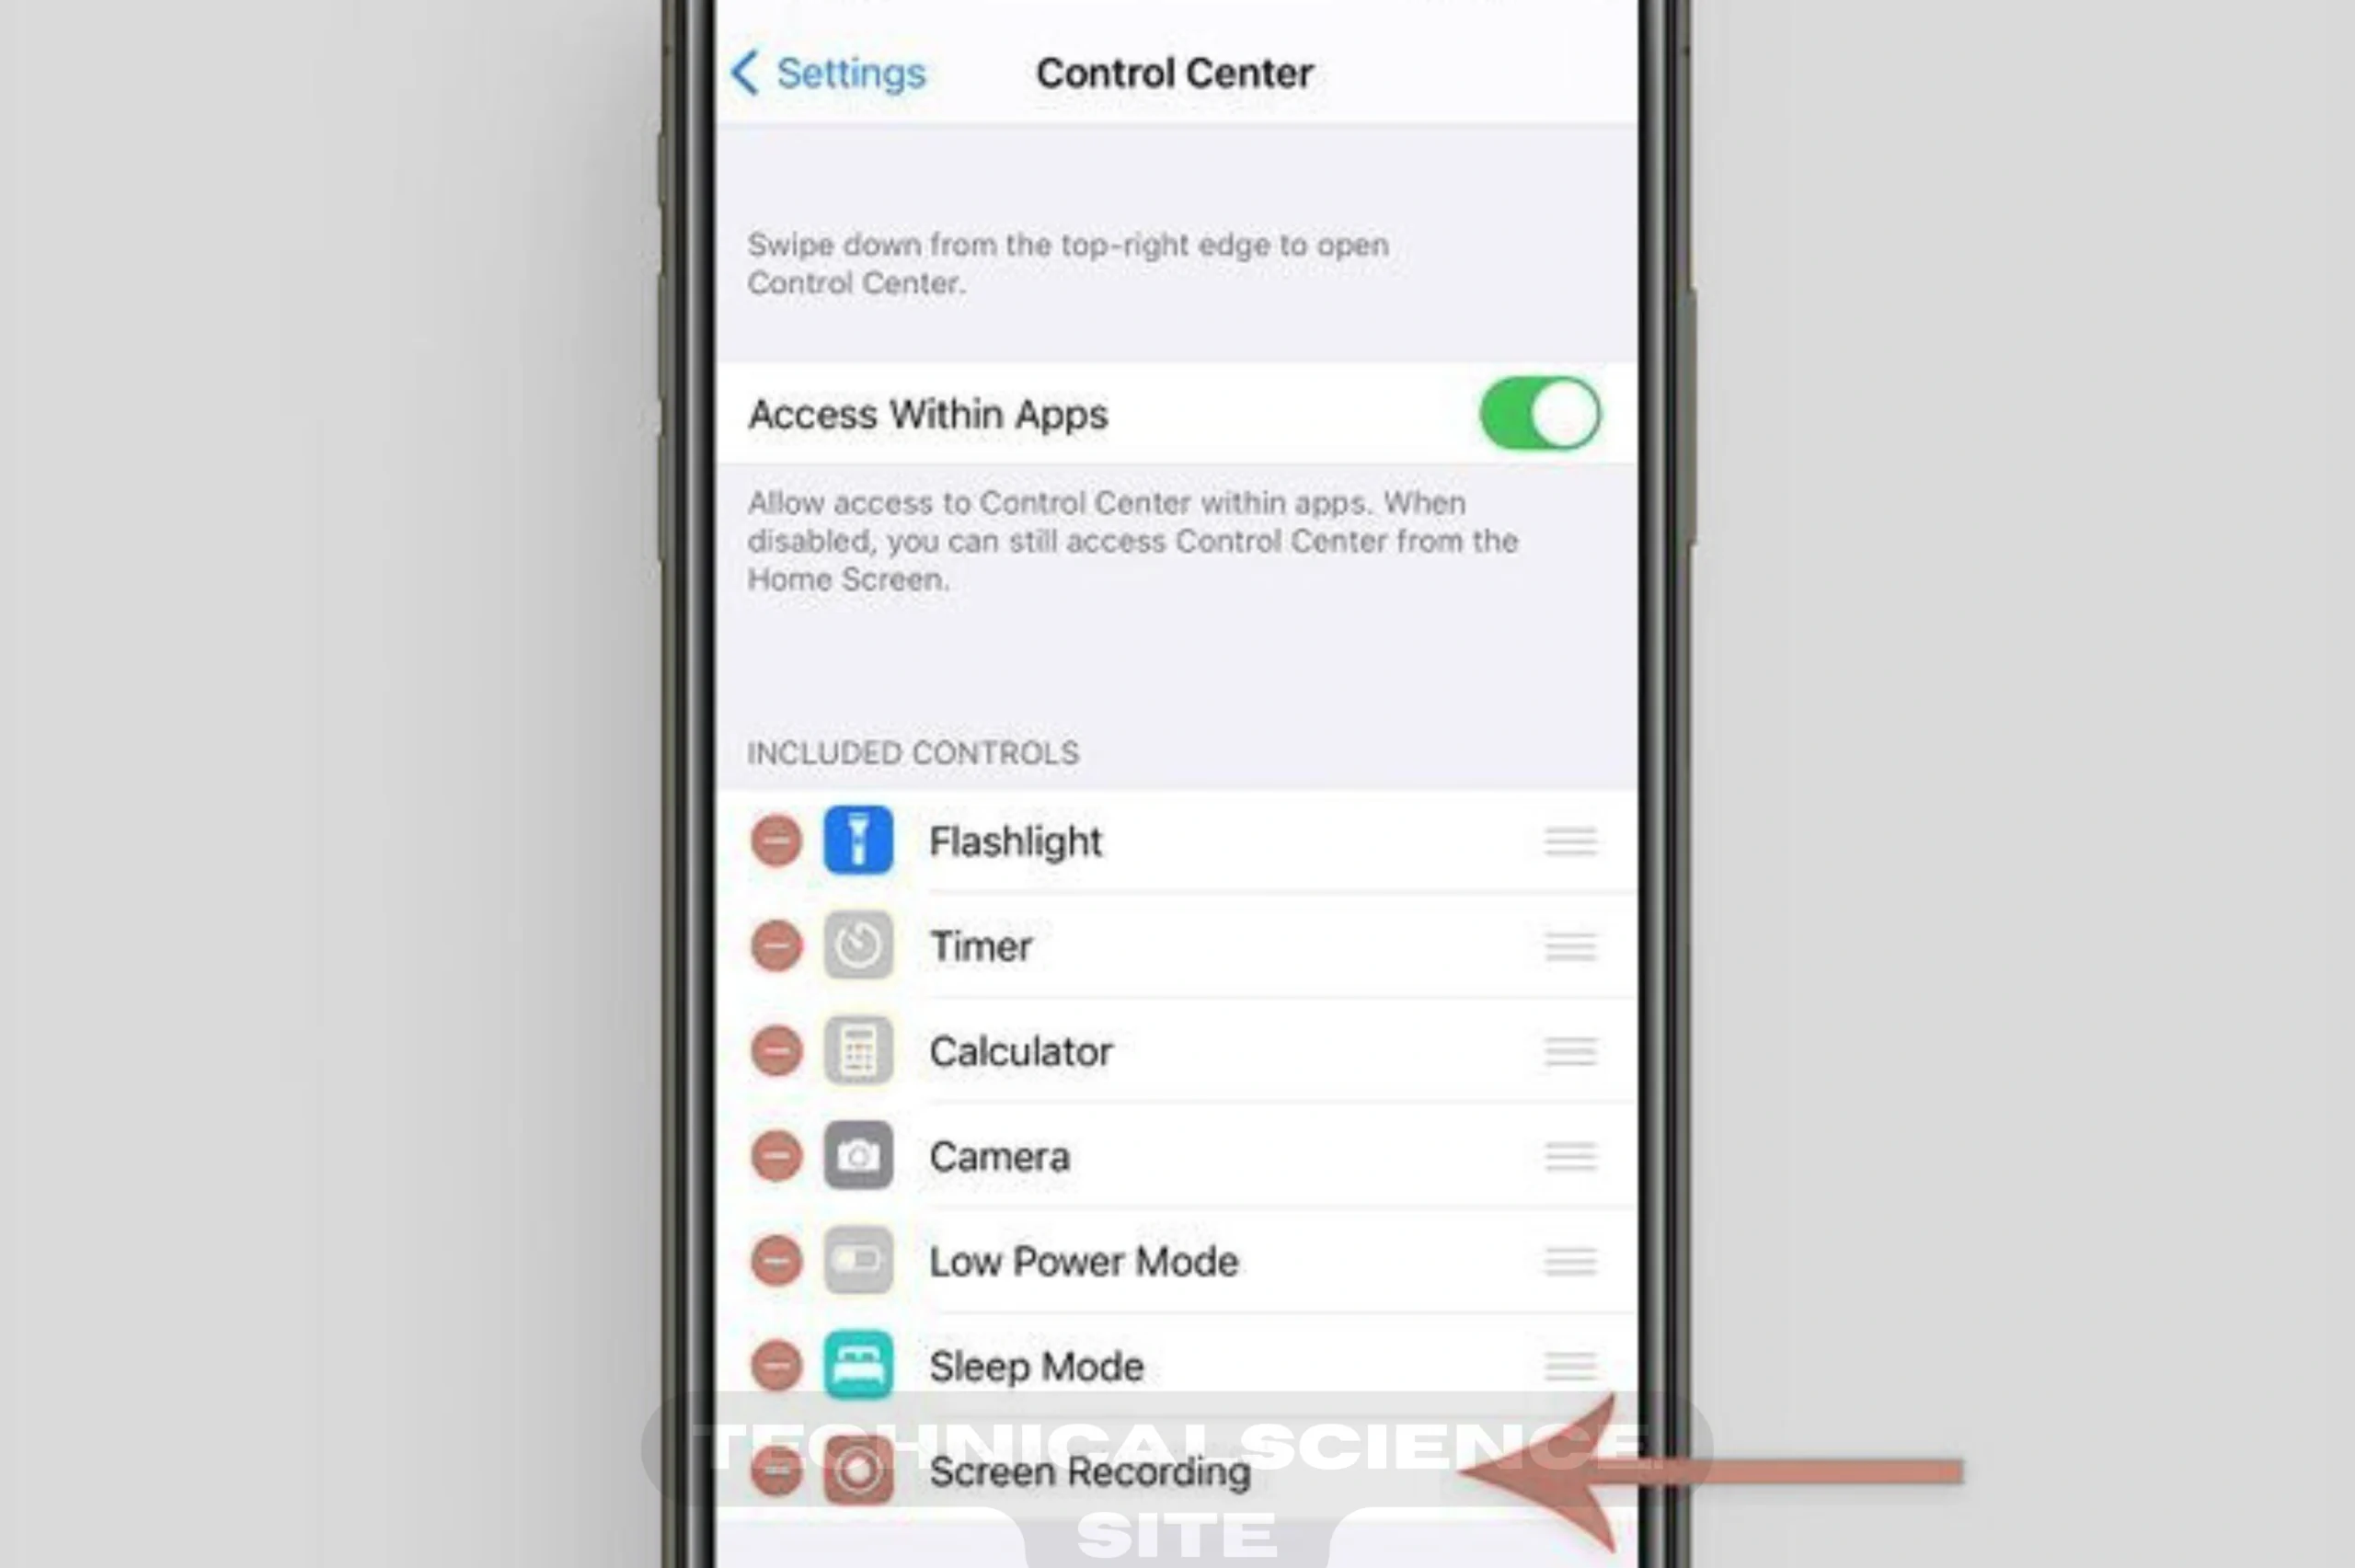
Locate Screen Recording in the “More Controls” area. Tap the green + icon beside it.
After that, you will be able to see the screen record button in your Control Center whenever you swipe down (or swipe up on older models). And you’re good to go!
Accessing iPhone Settings
If you want to feel confident when using your iPhone, then it is essential to learn how to navigate the Settings app. This is where you access all the important features, such as screen recording.
Finding Settings: The Settings app is normally located on your home screen. However, if you can’t find it, then you can swipe down and search for “Settings” in the search bar. Alternatively, you can ask Siri to open it for you.
Opening Control Center: After opening the Settings app, you need to scroll down and tap Control Center. This is where you control quick access functions such as the flashlight, camera, and screen recording. Getting this set up right will save you time in the long run.
Customizing Your Control Center
Now that you have screen recording enabled, you can customize your Control Center to make all your features easily accessible.
Add Screen Recording: To add screen recording to your Control Center, go to Settings > Control Center. Scroll down to “More Controls.” Find Screen Recording and tap the green + icon to add it.
Reorganize Your Controls: You can rearrange the features in your Control Center. Simply drag the features to the spot where you want them so your favorite features are easily accessible.
Microphone Option: If you want to record audio while screen recording, tap and hold the Screen Recording button in your Control Center. You can then turn the microphone on or off.
Adjusting Screen Recording Settings
After adding all the features, you can now adjust the settings for your recording.
Microphone On or Off: To record with your microphone, press and hold the Screen Recording button and tap the microphone icon. To turn it off, tap the microphone icon again.
System Sound: Your iPhone will record system sound unless your iPhone is muted. This is important if you have music playing in the background.
Video Quality: Your iPhone will automatically record in high quality. However, there is no option to reduce the quality. This is important if you plan to record for an extended period of time.
How to Start Screen Recording?
Once you have finished the setup process, recording a screen is easy.
Open Control Center: For Face ID models, swipe down from the top-right corner of the screen. For Touch ID models, swipe up from the bottom of the screen.
Tap the Screen Recording Button: Tap the circular record button. A three-second countdown will begin before the recording process starts.
Stop Recording: To stop the recording, open Control Center and tap the record button or tap the red status bar located at the top of your screen.
As soon as the recording process begins, a red bar or indicator will appear to confirm that your screen is being recorded. Once you have stopped the recording, your video will automatically be saved to the Photos app.
Recording Audio with iPhone (Loud and Clear)
Recording the screen without audio can sometimes leave you with a sense of incompleteness. If you want to record audio from your voice, app sounds, or even gameplay audio, here’s how you can do it correctly.
How to Screen Record on iPhone with Audio
- Access the Control Center.
- Press and hold the Screen Recording button.
- Tap the Microphone button to enable it (it turns red).
- Tap the Start Recording button.
Your iPhone will record system sounds by default unless your iPhone is muted. This means that if you are playing music or app sounds, they will also be recorded.
Advanced Screen Recording Capabilities
Screen recording has come a long way in recent iPhone generations. For instance, in the latest iPhone 16 models, Apple has incorporated spatial video recording and enhanced audio control.
For instance, spatial video recording is compatible with devices such as the Apple Vision Pro. This provides a more immersive experience for viewers. There are also tools such as Audio Mix that enable improved audio control after the recording process.
Recording Specific Apps (What You Should Know)
Not all apps support screen recording.
Apps That Block Recording
Streaming apps such as:
These services employ DRM protection. When you attempt to record, you will notice a black screen.
Social Media Apps
- Instagram: Recording stories is possible without alerting the user, but music might be muted.
- TikTok: Recording is possible, but downloaded videos might have a watermark.
- Snapchat: The user will receive a notification if you record their content.
- YouTube: Recording is possible, but copyrighted content might still be detected.
Picture-in-Picture (PiP) Recording
Picture-in-Picture allows you to record a video playing in a small window while using other apps.
How to do it:
- Play a video in a supported app.
- Swipe up to switch to the Home Screen.
- The video will shrink into a small movable window.
Not all apps support PiP. YouTube Premium and Apple TV support it, but it’s different for each app.
Recording Multiple Apps
You can record while switching between apps. All apps open on your screen will be recorded.
For better results:
- Practice switching between apps before recording.
- Close background apps you don’t need.
- Ensure your phone isn’t overloaded.
Editing Your Screen Recording
After you have finished recording your screen, you can open your video in the Photos app.
You can:
- Trim the beginning or end of your video.
- Use Markup to add text or drawings.
- Adjust the brightness or contrast.
- Use filters if you need to.
After you are done, you can share your video using AirDrop, social media, or cloud storage such as iCloud or Google Drive.
Common Screen Recording Issues (And Solutions)
1: Audio
- Ensure the mic is enabled.
- Check if your phone is muted.
- Restart your phone if necessary.
2: App Not Recording
Some apps may not record due to privacy or copyright issues.
3. Storage is Full
Go to: Settings > General > iPhone Storage
Remove unnecessary apps or store files online.
4. Battery Draining Quickly
Screen recording consumes more battery power. Use low brightness and have a charger handy if recording for an extended period.
Storage Tips for Long Recordings
If you are recording for a long period of time:
- Split your videos into smaller pieces.
- Check your storage space before you begin.
- Upload your completed recordings to cloud storage to free up space.
Legal and Copyright Issues
When learning how to screen record on an iPhone, remember:
- Some applications are designed to prevent recording.
- Recording copyrighted content and sharing it can lead to issues.
- Always ask for permission before recording a private conversation.
Conclusion
Learning how to screen record on iPhone is easy once everything is set up correctly. Whether you have an iPhone 13, an iPhone 14, an iPhone 15, an iPhone 16, an iPhone 17, or an iPhone SE, the process is easy to follow.
From turning on screen recording on the Control Center to recording with sound and adjusting the microphone, every step is meant to be smooth and efficient. With advancements in the newer models such as the iPhone 16, with features such as improved audio control and spatial video support for devices such as the Apple Vision Pro, screen recording has become even more powerful.
As long as you take care of storage, battery, and copyright guidelines, you can use this feature with confidence.
Frequently Asked Questions (FAQs)
How do I screen record on iPhone with sound?
You need to open Control Center, press and hold the Screen Recording button, tap the Microphone icon to turn it on, and finally tap Start Recording.
How do I put screen record on iPhone?
You need to go to Settings > Control Center and tap the green + icon beside Screen Recording.
How to screen record on iPhone 13?
You need to turn on Screen Recording in Control Center, swipe to open Control Center, and tap the Screen Recording button.
How to screen record on iPhone 14?
It’s the same as other models – add Screen Recording to Control Center and tap the record button.
How to screen record on iPhone 15?
Open Control Center and tap the Screen Recording icon after enabling it in Settings.
How to screen record on iPhone 16?
Swipe down to open Control Center and tap Screen Recording. You can also enable the microphone for audio recording.
How to screen record on iPhone 17?
The process is the same. Use Control Center to start and stop screen recording.
How to screen record on iPhone SE?
Swipe up from the bottom to open Control Center and tap the Screen Recording button.
Why is my screen recording not working?
Ensure that Screen Recording is added to Control Center, there is available storage space, and the microphone is turned on if you want to record audio.
Read Also: